
Quick answer
Open the short left orange bar and lower green corner. Work through the central red and blue bends before clearing the outer purple frame.
- Level
- Level 165
- Difficulty
- Hard
- Objective
- Separate all linked pieces in this layout: Hard zigzag made entirely from sleeve-linked bars. Align each opening with its connection, then clear the remaining branches.
Video walkthrough
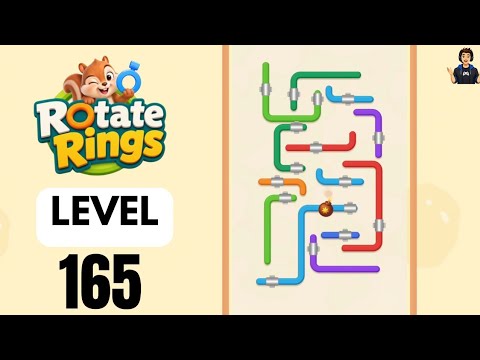
Video by GAMISTAN ARENA on YouTubeWatch on YouTube
YouTube loads only when you press play. You can also open the video on YouTube.
Step-by-step
Open the short left orange bar and lower green corner. Find the actual gap on this piece before turning it. Follow its contact with the neighboring link, rather than assuming the colored outlines form one object. Make a small controlled rotation and check whether the connection has released before selecting another part.
Work through the central red and blue bends before clearing the outer purple frame. Reassess the structure after each release: a piece that looked trapped at the start may now have only one neighbor. Use the empty area to see the next contact clearly. Follow the branch described here instead of jumping to a similar color elsewhere.
Finish the upper green U-shaped bar and last red horizontal piece. Watch the final connection as well as the open ends. A nearly empty board can still contain a linked pair, so keep aligning the gap with the remaining contact. Stop repeating a turn that changes nothing and inspect which neighboring piece still holds the chain.
Tips
- Open the short left orange bar and lower green corner.
- Work through the central red and blue bends before clearing the outer purple frame.
- Finish the upper green U-shaped bar and last red horizontal piece.
- After every release, check which pieces are still connected; color alone does not determine the move order.
Common mistakes
- These shapes use sleeve joints rather than ordinary ring gaps, so follow the bar's actual allowed movement.
- Repeating the same rotation without checking the opening and the remaining contact.
Frequently asked questions
How do I start Rotate Rings level 165: Hard zigzag made entirely from sleeve-linked bars?
Open the short left orange bar and lower green corner. Match this branch by its position and shape before moving. If your starting arrangement differs, compare the video with your board rather than forcing the same sequence.
What is the key transition in level 165?
Work through the central red and blue bends before clearing the outer purple frame. Keep watching the contact points as the structure shrinks. The next release depends on what remains linked, so recheck the gap after a neighboring piece disappears.
What can block the finish in this layout?
These shapes use sleeve joints rather than ordinary ring gaps, so follow the bar's actual allowed movement. For the finish: Finish the upper green U-shaped bar and last red horizontal piece. Move one remaining piece at a time and wait for its release before deciding whether another contact still needs attention.